Obviously, you are eager to open your Visual Studio .NET
2003 and start coding. So let us do it.
1.
Open Visual Studio .NET 2003, create a new ASP.NET website and give it a
name: EDropDown.
2.
In the default form created, insert two labels and two HTML
input boxes.
3.
Give the first label a text property My Product Name
and the second one a text property My Employee Name.
4.
As for the two input boxes, put the ID property type TxtProductName and
TxtEmployeeName in sequence.
By now we should have Figure 1 on the first form, the
default start up design.
Figure 1

5.
Now, we move to the Drop Down list WebForm in order to build it. In the
solution explorer window, right click the solution name and choose Add New Item then choose a web form and save the file as NamePicker.aspx.
Figure 2
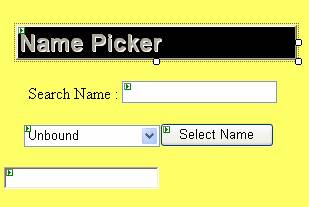
6.
It is a good idea to start with the picture to display the form design.
Take a look at Figure 2.
7.
As you can see, you should start with a label that displays a title for
the page Name Picker.
8.
Create another label with a text property Search Name.
Create an HTML input box in front of
it with an ID property TxtOldName.
9.
Create a drop down box called CbxName.
10. Create
an html button called Button1
and a value Select Name.
At the end, create an HTML input box
with an ID property TxtNewName with type Hidden.
Now for the behind the scene work, we have to insert the
following JavaScript inside the head tag of the HTML view of the form.
Listing 1
<script language = "JavaScript">
function FindText(finder_textbox, finder_selectbox)
{
  var searchstr = finder_textbox.value;
  var myexp = new RegExp(("^" + searchstr), "i");
  var foundresult = false;
  var i = 0;
  while ((foundresult = false) || (i < finder_selectbox.length))
  {
    if (myexp.test(finder_selectbox.options[i].text))
    {
      finder_selectbox.options[i].selected = true foundresult = true;
      document.Form1.TxtNewName.value = finder_selectbox.options[i].text;
      i = 32768;
    }
    i++;
  }
}

function FindText1(finder_textbox, finder_selectbox)
{
  var searchstr = finder_textbox.value;
  var myexp = new RegExp(("^" + searchstr), "i");
  var foundresult = false;
  var i = 0;
  while ((foundresult = false) || (i < finder_selectbox.length))
  {
    if (myexp.test(finder_selectbox.options[i].text))
    {
      finder_selectbox.options[i].selected = true foundresult = true;
      document.Form1.TxtNewName.value = finder_selectbox.options[i].text;
      i = 32768;
      window.close();
    }
    i++;
  }
}

function Done()
{
  var par1 = "par1";
  var par2 = "par2";
  var par3 = "par2";
  var par4 = "par2";
  par1 = document.Form1.TxtNewName.value;
  par2 = document.Form1.TxtNewName.value;
  par3 = document.Form1.TxtNewName.value;
  par4 = document.Form1.TxtNewName.value;
  var MyArgs = new Array(par1, par2, par3, par4);
  window.returnValue = MyArgs;
  window.close();
}

function doInit()
{
  var par1 = "Apar";
  var par2 = "par2";
  var par3 = "par3";
  var par4 = "par4";
  var MyArgs = new Array(par2, par3, par4);
  MyArgs = window.dialogArguments;
  document.Form1.TxtOldName.value = MyArgs[1].toString();
  document.Form1.TxtPattern.Text = document.Form1.TxtPattern.Text + ' : ' +
    MyArgs[0].toString();
}

function SetValue(finder_selectbox)
{
  var foundresult = false;
  var i = 0;
  document.Form1.TxtNewName.value = finder_selectbox.value;
  document.Form1.TxtOldName.value = finder_selectbox.value;
}

function CheckEnter()
{
  if (event.keyCode == 13)
    Done();
}
</script>
11. Another
addition is to the body tag of the form in order to allow it to set focus and
return the name on exit.
Listing 2
<body onblur="this.window.focus();" bgColor="#ffff66"
onload="doInit()" ms_positioning="FlowLayout" onunload="Done();">
12. When
the user presses any key in the search box, the dropdown box should select the
nearest match to it. This is done by inserting the following HTML code.
13. A
change to Select Name is also needed as follows.
Listing 3
<BUTTON id="BUTTON1" onmousedown="SetValue(CbxName);"
onclick="Done();" type="button" runat="server">
14. You
can now close the HTML view and return to the design view.
15. In
the Page load event of the form insert the following code.
Listing 4
If Not Me.IsPostBack Then
  Call SetupData()
End If
16. The
setup data procedure is the key to our dropdown box.
Listing 5
Public Sub SetupData()
  Dim MySQLConnection As New SqlClient.SqlConnection
  Dim MySQLCommand As New SqlClient.SqlCommand
  Dim MyDataAdapter As New SqlClient.SqlDataAdapter
  Dim MyDataSet As New Data.DataSet
  Dim ESQL As String
  ESQL = Request.QueryString().Get("ESQL")
  ESQL = ESQL.Replace("char(43)", "+")
  MySQLConnection.ConnectionString =
"Data Source=.; Initial Catalog=Northwind; User ID=sa; Password=pass@word1"
  MySQLConnection.Open()
  MySQLCommand.Connection = MySQLConnection
  MySQLCommand.CommandType = CommandType.Text
  MySQLCommand.CommandText = ESQL
  MyDataAdapter.SelectCommand = MySQLCommand
  MyDataAdapter.Fill(MyDataSet, "ComboBoxTable")
  CbxName.DataSource = MyDataSet
  CbxName.DataMember = "ComboBoxTable"
  CbxName.DataValueField = MyDataSet.Tables.Item("ComboBoxTable").Columns(0).ColumnName
  CbxName.DataTextField = MyDataSet.Tables.Item("ComboBoxTable").Columns(1).ColumnName
  CbxName.DataBind()
  CbxName.SelectedIndex = 0
  TxtNewName.Value = CbxName.SelectedValue
  MySQLConnection.Close()
End Sub
Now we turn back to our webform1 and add the following for
the two input boxes and for the employee input box.
Listing 6
<INPUT onkeypress="if (event.keyCode == 13)
 this.value=NamePicker('Select ProductID, ProductName From Products',this.value,this.value);"
 ondblclick="this.value=NamePicker('Select ProductID, ProductName
From Products',this.value,this.value);"
 id="TxtProductName"
 type="text" name="TxtProductName"
 runat="server"></P>
Listing 7
<INPUT onkeypress="if (event.keyCode == 13)
 this.value=NamePicker('Select EmployeeID, FirstName + char(32) + LastName
From Employees',this.value,this.value);"
 ondblclick="this.value=NamePicker('Select EmployeeID, FirstName char(43)
 char(32) char(43) LastName From Employees',this.value,this.value);"
 id="TxtEmployeeName" type="text" name="TxtEmployeeName"
 runat="server">
17. Since
our input boxes are calling a JavaScript function, we need to provide the code
for it in the header section of the HTML.
Listing 8
<script language = "javascript" type = "text/javascript" > function
   TrimString(sInString)
{
  sInString = sInString.replace( /  ^  \
    s +  / g, ""); // strip leading
  return sInString.replace( /  \
    s + $ / g, ""); // strip trailing
}

function NamePicker(StrSQL, StrOldName, StrNewName)
{
  StrOldName = TrimString(StrOldName);
  StrNewName = TrimString(StrNewName);
  var MyArgs = new Array(StrSQL, StrOldName, StrNewName);
  var WinSettings =
    "center:yes;resizable:no;dialogHeight:300px;dialogWidth:350px";
  var MyArgs = window.showModalDialog("NamePicker.aspx?ESQL=" + StrSQL, MyArgs,
    WinSettings);
  if (MyArgs != null)
  {
    return MyArgs[0].toString();
  }
}
</script>
Congratulations, you have created your popup searchable
dropdown box that satisfies your needs.