In this section let us look into a simple complete web
application, FormAuthDemo, which is ASP.NET 2.0 based and uses SQL Server 2005
to persist the logging-in users' information.
This core part of the following should be step 3, where we use
asymmetric encryption to encrypt the hashed password and decrypt the hashed
password later.
1. Create a Web Application with a Login Page
This procedure creates a simple C# Web application that
contains a login page which allows a user to enter a username and password.
Start Visual Studio 2005 and create a new C# ASP.NET Web
application called SQLAuthTest. Then add a few simple controls to Default.aspx
to create a simple login form. Your final Web page in Design View should look
like the one illustrated in Figure 2.
Figure 2
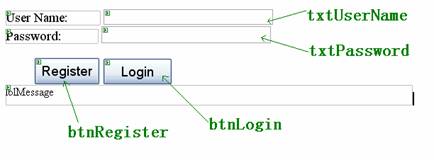
Do not forget to set the TextMode property of the
txtPassword to Password.
Also note that we use Forms
authentication mode in this sample. For more details please refer to the
downloaded sourcecode of the article.
2. Generate a Hash and Salt value
This procedure adds two utility methods to your Web
application; one to generate a random salt value and the other to create a hash
based on a supplied password and salt value.
Open Default.aspx.cs and add the following using statements
to the top of the file beneath the existing using statements.
Listing 2
//……
using System.Security.Cryptography;
using System.Web.Security;
Add the following static method to the helper class AuthenticationUtilities
to generate a random salt value and return it as a Base 64 encoded string.
Listing 3
private static string CreateSalt(int size)
{
  // Generate a cryptographic random number using the cryptographic
  // service provider
  RNGCryptoServiceProvider rng = new RNGCryptoServiceProvider();
  byte[]buff = new byte[size];
  rng.GetBytes(buff);
  // Return a Base64 string representation of the random number
  return Convert.ToBase64String(buff);
}
Add the following static method to generate a hash value
based on a supplied password and salt value.
Listing 4
private static string CreatePasswordHash(string pwd, string salt)
{
  string saltAndPwd = String.Concat(pwd, salt);
  string hashedPwd = FormsAuthentication.HashPasswordForStoringInConfigFile
    (saltAndPwd, "SHA1");
  hashedPwd = String.Concat(hashedPwd, salt);
  return hashedPwd;
}
3. Create a User Account Database
This procedure is the most attractive part of the whole
story. First logon to SQL Server Management Studio and connect to your local
SQL Server 2005. In this scenario I use the Windows Authentication Mode. Click
the New Query icon and then enter the following SQL script. Remember to replace
“LocalMachine” with your own computer name (for the downloaded sourcecode, I
use my test computer name “zxzcom”) towards the end of the script.
Listing 5
USE master
GO
-- create a database for the security information
IF EXISTS (SELECT * FROM   master..sysdatabases WHERE  name =’UserAccounts’)
      DROP DATABASE UserAccounts
GO
CREATE DATABASE UserAccounts
GO
USE UserAccounts
GO

CREATE TABLE Users (
      UserName varchar(40) NOT NULL ,
      EncryptedPasswordHash varbinary(8000) NOT NULL ,
      salt varchar(10) NOT NULL,
      CONSTRAINT PK_Users PRIMARY KEY  CLUSTERED

      UserName
      )  ON [PRIMARY]
) ON [PRIMARY]
GO
--
CREATE MASTER KEY ENCRYPTION BY PASSWORD = ‘p@ssw0rd’;
CREATE ASYMMETRIC KEY Asym_Password
WITH ALGORITHM = RSA_512;
go
-- create a stored procedure to register user details
CREATE PROCEDURE RegisterUser
@userName varchar(40),
@passwordHash varchar(50),
@salt varchar(10)
AS
      BEGIN
            Declare @encrystaff varbinary(8000);
            -- here,we use asymmetric encryption to cipher the hashed password
            SET @encrystaff=EncryptByAsymKey(AsymKey_ID(‘Asym_Password’),                 @passwordHash);
            INSERT INTO Users VALUES(@userName,@encrystaff , @salt)
      END
GO
-- create a stored procedure to retrieve user details
CREATE PROCEDURE LookupUser
@userName varchar(40)
AS
      BEGIN
            SELECT CONVERT(nvarchar(50),
                  -- use the private key inside the asymmetric key pair
                  -- created above to decipher the hashed password.
                  DecryptByAsymKey(AsymKey_ID(‘Asym_Password’), EncryptedPasswordHash)  ), salt
            FROM Users
            WHERE UserName = @userName
      END
GO

exec sp_grantlogin [LocalMachine\ASPNET]
-- Add a database login for the UserAccounts database for the ASPNET account
exec sp_grantdbaccess [LocalMachine\ASPNET]
-- Grant execute permissions to  stored procs
grant execute on LookupUser to [LocalMachine\ASPNET]
grant execute on RegisterUser to [LocalMachine\ASPNET]
Now, run the query to create the UserAccounts database.
4. Use ADO.NET to Store Account Details in the Database
Return to VS2005 and double-click the Register button on the
Web form to create a button click event handler. Then add the following code
to the handler method.
Listing 6
int saltSize = 5;
string salt =AuthenticationUtilities.CreateSalt(saltSize);
string passwordHash =
AuthenticationUtilities.CreatePasswordHash(txtPassword.Text, salt);
try
{
  AuthenticationUtilities.StoreAccountDetails(txtUserName.Text, passwordHash, salt);
}
catch (Exception ex)
{
  lblMessage.Text =” Execption in btnLogin_Click event. ”;
}
Next, create the following StoreAccountDetails utility
method. First, add the following using statement at the top of the file beneath
the existing using statements.
Listing 7
using System.Data.SqlClient;
//Stores the account details in a SQL table-----UserAccounts
internal static void StoreAccountDetails(string userName, string passwordHash,
  string salt)
{
  using(SqlConnection conn = new SqlConnection("Server=localhost;" +
    "Integrated Security=SSPI;" + "database=UserAccounts"))
  {
    SqlCommand cmd = new SqlCommand("RegisterUser", conn);
    cmd.CommandType = CommandType.StoredProcedure;
    SqlParameter sqlParam = null;

    sqlParam = cmd.Parameters.Add("@userName", SqlDbType.VarChar, 40);
    sqlParam.Value = userName;
    sqlParam = cmd.Parameters.Add("@passwordHash", SqlDbType.VarChar, 50);
    sqlParam.Value = passwordHash;

    sqlParam = cmd.Parameters.Add("@salt", SqlDbType.VarChar, 10);
    sqlParam.Value = salt;

    try
    {
      conn.Open();
      cmd.ExecuteNonQuery();
    }
    catch (Exception ex)
    {
      throw new Exception("Execption StoreAccountDetails. " + ex.Message);
    }
    finally
    {
      conn.Close();
    }
  }
}
Here we use ADO.NET to connect to the UserAccounts database
and to store the supplied username, password hash and salt value in the Users
table.
5. Authenticate User Credentials Against the Database
Return to the Default.aspx.cs and add the VerifyPassword
helper method as shown in the following code.
Listing 8
//Method that indicates whether
//the supplied username and password are valid
internal static bool VerifyPassword(string suppliedUserName, string
  suppliedPassword)
{
  bool passwordMatch = false;
  using(SqlConnection conn = new SqlConnection("Server=localhost;" +
    "Integrated Security=SSPI;" + "database=UserAccounts"))
  {
    SqlCommand cmd = new SqlCommand("LookupUser", conn);
    cmd.CommandType = CommandType.StoredProcedure;

//one parameter only: parameters passed to the StoredProcedure
    SqlParameter sqlParam = cmd.Parameters.Add("@userName", SqlDbType.VarChar,
      40);
    sqlParam.Value = suppliedUserName;
    try
    {
      conn.Open();
      using(SqlDataReader reader = cmd.ExecuteReader())
      {
        reader.Read();
        string dbPasswordHash = reader.GetString(0);
        string salt = reader.GetString(1);
// Now take the salt and the password entered by the user
// and concatenate them together.
        string passwordAndSalt = String.Concat(suppliedPassword, salt);
// Now hash them
        string hashedPasswordAndSalt =
          FormsAuthentication.HashPasswordForStoringInConfigFile
          (passwordAndSalt, "SHA1");
// Now verify them. Returns true if they are equal
        passwordMatch = hashedPasswordAndSalt.Equals(dbPasswordHash);
      }
    }
    catch (Exception ex)
    {
      throw new Exception("Execption verifying password. " + ex.Message);
    }
    finally
    {
      conn.Close();
    }
  }
  return passwordMatch;
}
6. Test the Application
This procedure is fairly direct, just follow the steps
below.
1. Open the Default form and double-click the Login button
to create a corresponding btnLogin_Click event handler.
2. Add the following code to the Login button click event
handler.
Listing 9
bool passwordVerified = false;
try
{
  passwordVerified = AuthenticationUtilities.VerifyPassword(txtUserName.Text,
    txtPassword.Text);
  if (passwordVerified)
  {
    FormsAuthentication.RedirectFromLoginPage(txtUserName.Text, false);
  }
  else
  {
    Response.Redirect("Default.aspx");
  }
}

catch (Exception ex)
{
  lblMessage.Text = string.Format(CultureInfo.InvariantCulture, ex.Message);
  return ;
}

if (passwordVerified == true)
{
// The user is authenticated
  lblMessage.Text = "Logon successful: User is authenticated";
  ;
}

else
{
  lblMessage.Text = "Invalid username or password";
  ;
}
Here we call the VerifyPassword method and display a message
based on whether or not the supplied user name and password are valid.
3. In Solution Explorer, right-click Default.aspx and then
click View in the Browser. Enter a user name and password and then click
Register.
Note that you may use SQL Server 2005 Management Studio to
view the contents of the Users table. You should see a new row for the new
user name together with a generated asymmetrically encrypted password hash.
4. Return to the Login Web page, re-enter the password, and
then click Login. You should see the message "Logon successful: User is
authenticated."
5. Now enter an invalid password (leaving the user name the
same). You should see the message "Invalid username or password."
That is about the whole story!