|
|
Creating Professional Reports using Crystal Report for Visual Studio.NET (Part 2)
|
by Eric Landes
Feedback
|
Average Rating: This article has not yet been rated.
Views (Total / Last 10 Days):
38976/
68
|
|
|
|
| Introduction |
Editor's Note: The first edition of this article was written by Ajay Varghese.
In the previous part we saw how the Report Expert wizard just dumps all the items of the report into the predefined sections in an order irrespective of the exact requirement. Now, it is up to us to move these items around and place it in a particular order to get the desired result. This is the tricky part of the whole report creation.
The next obvious step would seem like moving the items to its appropriate Group, but this is where the trouble starts. If you do this and view the report in a browser, you would notice all the Group Names being repeated. As you drill down each time, you would notice an extra row at the bottom of the report which is the parent Group Name, and you get to see all the details together, only after you have drilled down to the last section. |
| Existing Sections |
Before we proceed, it would help to get an understanding of the various sections that have been created and where each of the items has been placed. The current layout is as shown below: 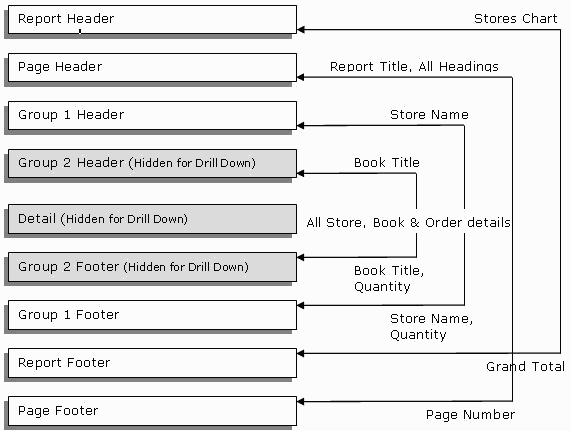
Your Crystal Report Designer screen should be similar to the image shown below  |
| Changes: Big Picture |
To get the desired result, the trick here is to use a higher level Header section to display the headings and a lower level Footer section to display the actual values. For example, placing the headings related to the Store in the Report Header and placing its corresponding values in the Group 1 Footer will generate a report which will display the Store heading only once but will repeat the corresponding values depending on the number of records in the database.
We will also have to move the Book details and Order details to the lower sections and format it in such a way that it can be viewed only by drilling down to it.
Modify the existing layout as shown below : 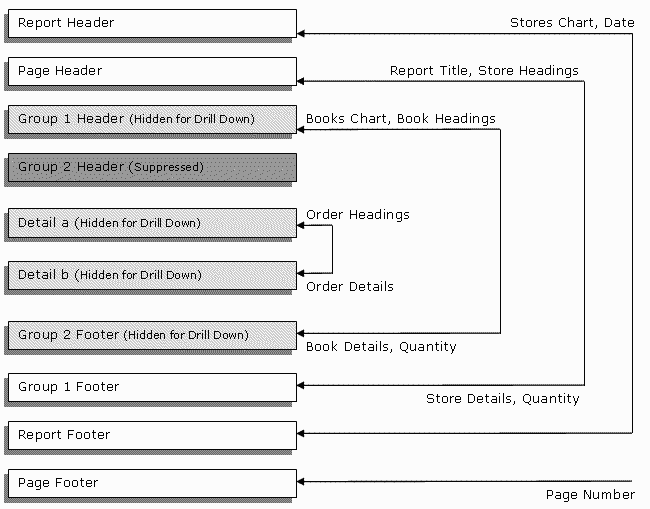
Your Crystal Report Designer screen should now look similar to the image shown below. Incase, your report contains an extra Group 1 Header called 'Group Header #1 b', you could leave it alone as it would not make any difference to the final report. 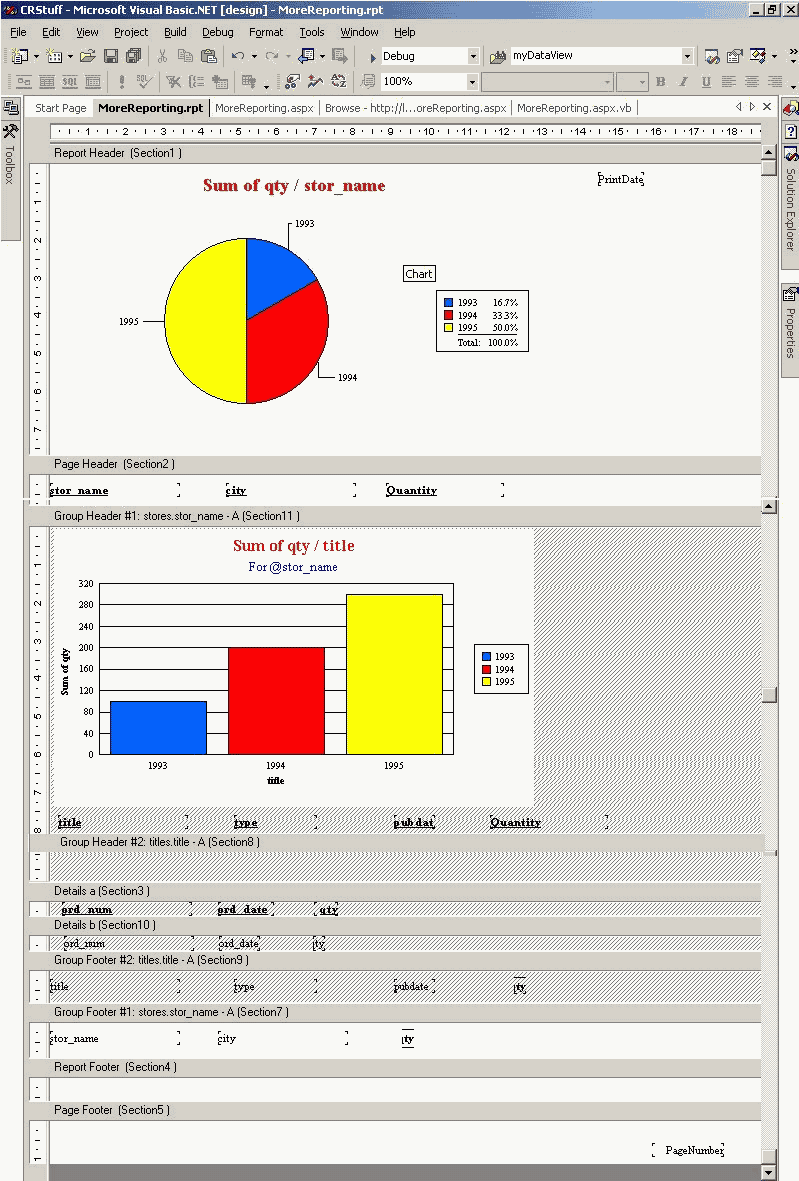
The following tips explains how-to achieve certain tasks while converting from the old layout to the new layout. |
| Group 1 Header |
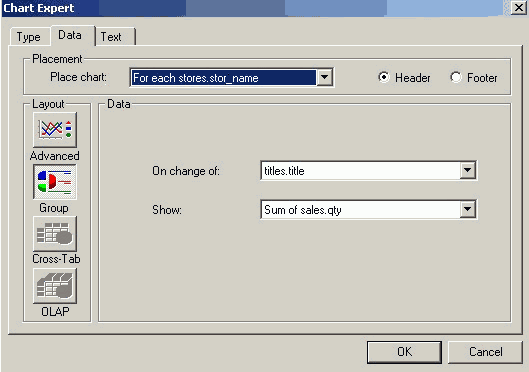
Insert a new chart into the Group 1 Header to represent the Book Titles.
Right click within the Group 1 Header area, select Insert and then select Chart.
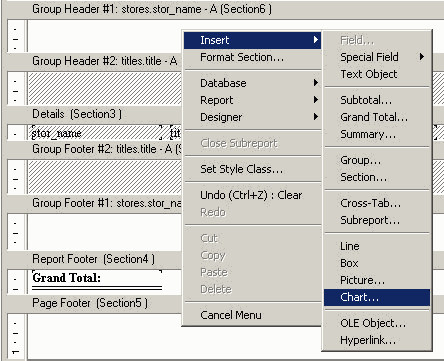
From the pop-up window, select Bar graph from the Type tab, and set the Placement option on the Data tab to For each Stores.stor_name so that the chart is plotted depending on the Store.
- Hide Group 1 Header initially, to allow viewing the details only thru Drill down
Right click on the Group 1 Header Panel, select Hide (Drill Down OK) |
| Suppress the Group 2 Header |
Right click on the Group 2 Header Panel and select Suppress (No Drill Down).
Those sections that are either suppressed (permanently) or hidden (for drill down) will be shaded and hence can be distinguished from the normal sections easily. (It would have really helped if there was also a way to differentiate between the suppressed and hidden section, which does not seem to exist) |
| Insert Detail Section and additional heading |
- Insert a new Detail Section (Details b).
Right click on the Detail Section and select Insert Section Below
- Insert an additional heading (for Quantity)
Right click within the particular Group, and select Text Object, place it at the required position, double click on it and type in a title. |
| Create a Formula |
You must have noticed that the Publication Date and the Order Date displays the Date & Time currently and it needs to be formatted for date only. This can be achieved using a formula field.
Right click on the Formula Fields option under the Field Explorer window, and select New.
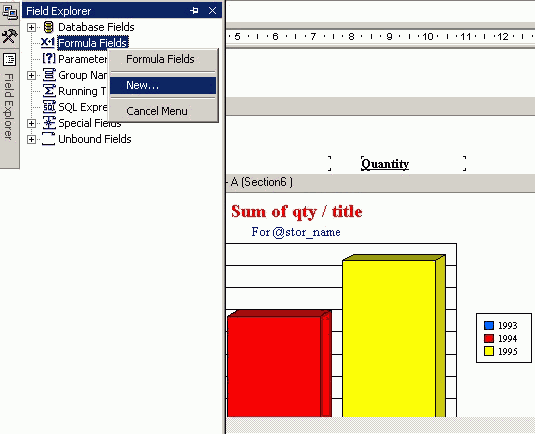
Give your formula a name and this opens up the Formula Editor window where you can type in the actual date conversion formula. Note that the image shows the code required to extract the date alone from the PublicationDate Field.
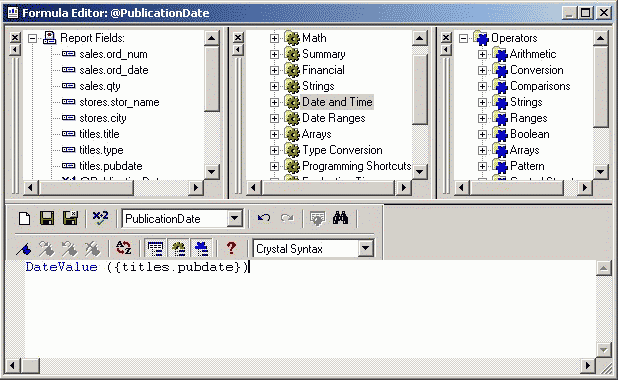
Now replace the original PublicationDate field on the report with this formula field.
Now view the report in a browser and you will notice that the report is getting real close to what we saw initially (at least functionality wise). |
| Conclusion |
Click here to view how the report should look in a browser
One thing that still hasn’t been fixed is that, each time you drill down into the details, one dangling parent record gets displayed at the bottom of the report. This is where conditional formatting comes to the rescue, which will be covered in the last part of this Walkthrough.
Crystal Resources
Crystal Alliance
Submitted by
Ajay Varghese & Shankar N.S
Sr. Software Engineers
Jarvis Infotech |
|
|
|
|
|
Product Spotlight

|
|
|