AspAlliance.com LogoASPAlliance: Articles, reviews, and samples for .NET Developers
URL:
http://aspalliance.com/articleViewer.aspx?aId=392&pId=-1
Email Bounce Automation Using BoogiePOP Enterprise - Part 2 of 2
page
by Scott Wolfington
Feedback
Average Rating: This article has not yet been rated.
Views (Total / Last 10 Days): 41399/ 39

Overview
Everyone handles bounces a little differently, but I always recommend keeping a tally of the number of times each email address bounces. For instance, create a "BounceCount" field in your email list table and increment it every time an email address bounces. If the "BounceCount" field reaches a value of 9 (you can use any number here; 9 is an example), then this is when I remove the address. I treat different types of bounces differently. For example, if an email address hard bounces, then I'll increment it's "BounceCount" field by 3. If an email address soft bounces, then I'll only increment it's "BounceCount" field by 1. You can weight each bounce category any way you'd like.

I'm using Microsoft Access 2000 for my database, but the principles within this article apply to any database system you may be using.

There are 2 steps to automating this process. They include:

  1. Configure Visual Basic Script (vbscript) to monitor bBounceLog table in your MS Access database (see download below)
  2. Configure Windows Scheduler to execute vbscript every 2 minutes
Pre-Requisites:
  1. Completed Part 1 of this article.
  2. BoogiePOP Enterprise installed prior to starting.
  3. You have Microsoft Access 2000 installed.
  4. Windows 2000 or later
  5. Internet Information Service (IIS) installed (for email forwarding option)
Download:

Download the zipped vbscript file from here, and unzip the BounceHandler.vbs file to your local hard drive. If you didn't download the support database from Part 1 of this article, then you'll want to unzip the email.mdb database too.

Configure Visual Basic Script - BounceHandler.vbs
NOTE: If you haven't downloaded the BounceHandler.vbs file yet, then you'll want to return to the first page of this article and download it. Click here to return to the first page.

In this section, I'll show you how to configure the BounceHandler.vbs script to you needs. If you haven't already, then you'll want to open the BounceHandler.vbs script in your favorite vbscript text editor. If you don't have a vbscript text editor, then just use notepad.

Step 1 - Configure Database Path

The first thing you need to do is tell the BounceHandler.vbs script where your MS Access database file is located. My Access database is called email.mdb, and it's located in my "c:\temp" folder (Full path is: "c:\temp\email.mdb"). The path to your Access database may be different. There is a variable near the top of the script called sDbPath (see image below). You'll need to set this variable to be the path of your Access database.


Step 2 - Configure Bounce Category Action Variables

There are 4 action variables that you can edit based on the type of bounce each message is. The variables and their descriptions can be found in the following table:

Variable Values Description
isForwardMessage True or False You may want to forward certain types of messages to yourself, or to someone else in your organization. For instance, I forward all NB and CR type messages to a real person within our company. Setting this variable to "True" tells the script to perform the "Email Forwarding" block of code further down in the script.
isSubscriptionRequest True or False This variable should be set to "True" when the message is a subscription request type message (i.e. SR or UR). Setting this value to "True" tells the script to perform the "Handle Subscription Request" block of code further down in the script.
isPerformCounterUpdate True or False This variable should be set to "True" when the message is an email bounce. When set to "True", the script will execute the "Update Bounce Counter" block of code further down in the script.
iBounceCountIncrement Integer The value of this variable is valid only when the "isPerformCounterUpdate" variable is set to "True". The value of this variable tells the script how much the BounceCount field should be incremented.


The image below illustrates how I've configured my Action Variables for a few of the different email bounce categories. You can configure your action variables however you like, and you may want to make changes to all of the Action Variables within each CASE code block in the script. It's up to you.


Non Bounce (NB) Messages - All "NB" messages will be forwarded to me because the isForwardMessage variable is set to "True".

Hard Bounce (HB) Messages - The isPerformCounterUpdate variable is set to "True", so the script will increment the BounceCount field, by a value of 3 (iBounceCountIncrement=3), of my EmailList table for the affected email address. All "HB" messages will not be forwarded to me because the isForwardMessage variable is set to "False".

Soft Bounce (SB) Messages - The isPerformCounterUpdate variable is set to "True", so the script will increment the BounceCount field, by a value of 1 (iBounceCountIncrement=1), of my EmailList table for the affected email address. All "SB" messages will not be forwarded to me because the isForwardMessage variable is set to "False".


Step 3 - Configure Email Forwarding

If you want to forward certain types of messages to a particular email address, then you'll need to change the 3 lines of code highlighted in the image below. These lines of code tell the script where to forward the message too. By default, the script is configured to forward all NB and CR type messages.

NOTE: In order for the email forwarding to work properly, you must have the IIS SMTP Server service installed on the machine that you're running the BounceHandler.vbs script on. If you don't have this installed, then you should set all of your isForwardMessage variables to "False", and deal with the affected email bounce types appropriately.


Step 4 - Test Configuration

Now that you are done configuring the BounceHandler.vbs script to meet your needs, it's time to test it. Test the vbs script by double-clicking on it from Windows Explorer.

Below is a screenshot of some sample data, as viewed from MS Access, in the bBounceLog and EmailList table prior to executing the BounceHandler.vbs script.


If you were able to execute the script successfully, then you should see something that looks like the following after the script has completed (should take less than 1 second). Notice that the values of the Processed field within the bBounceLog table are now set to 1, indicating that the email bounce records have been handled. You can also see that the BounceCount field for certain records in the EmailList table have been incremented, and the StatusId of another record has changed. You may need to close out of the table and then open it again to see the changes.


If everything looks good, then it's time to move on to the next step. In the next step, you'll be configuring the BounceHandler.vbs script to run at a specified time interval via the Windows Task Scheduler.


Create A Windows Scheduled Task For BounceHandler.vbs
By using Windows Task Scheduler, you can schedule your BounceHandler.vbs script to run at a time that is most convenient for you. Task Scheduler starts each time you start Windows 2000 and runs in the background.

With Task Scheduler, you can:

  • Schedule a task to run daily, weekly, monthly, or at certain times (such as system startup).
  • Schedule a task to run every n number of minutes, for a set period of time.
  • Change the schedule for a task.
  • Stop a scheduled task.
  • Customize how a task runs at a scheduled time.
To get started, you'll need to launch the Task Scheduler by clicking "Start - Programs - Accessories - System Tools - Scheduled Tasks", from your system's desktop. Once you've done that, you will see the following window on your desktop. Double-Click the "Add Scheduled Task" item, in the task list.


Double-Clicking the "Add Scheduled Task" item will present you with the first screen of the "Scheduled Task Wizard", as seen below.
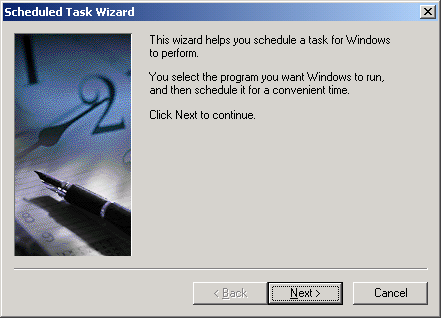


Clicking the "Next >" button will present you with the following window. You'll need to click the "Browse" button, and browse to the directory where your BounceHandler.vbs script is. In my case, I saved my BounceHandler.vbs script to my "c:\temp" folder.
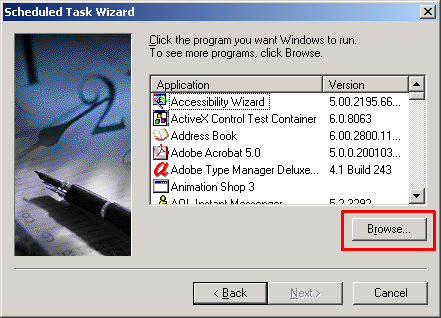


Clicking "Browse" will display the following "Select Program To Schedule" dialog. Browse to your BounceHandler.vbs script directory, select the BounceHandler.vbs script, and click "Open".
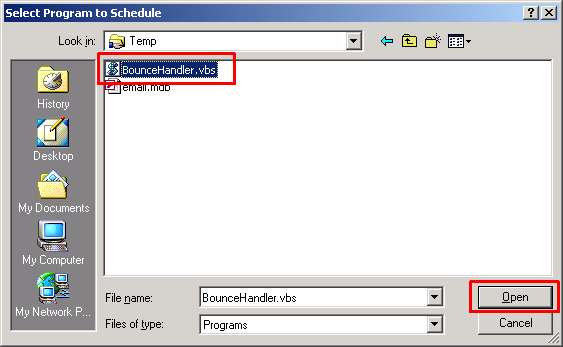


Once you've selected your BounceHandler.vbs script, you'll be taken back to the "Scheduled Task Wizard" where you'll see the following window. Select the "Daily" option, and click "Next >".
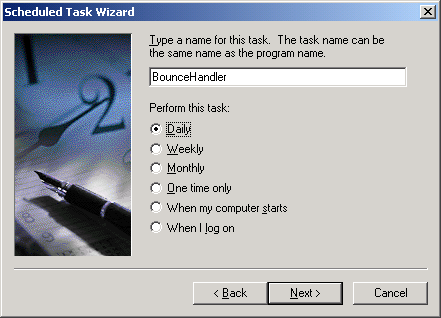


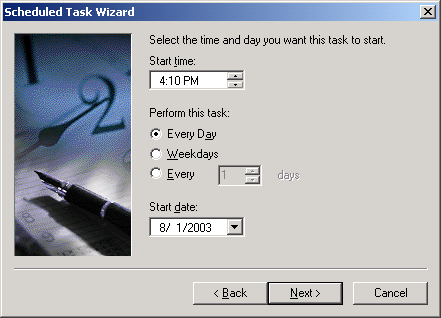
Next, you'll see the following window asking you to "select the time and day that you want this task to start". Just click "Next >".

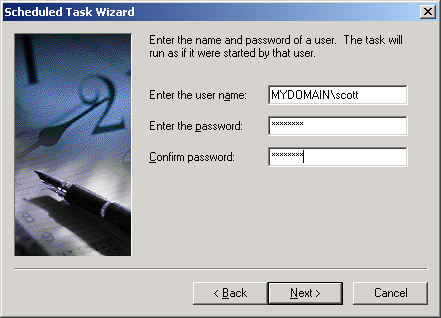
The "Scheduled Task Wizard" will now ask you to select a Windows user that the task should run as. The task will run as if it were started by that user, even when no one is logged into the machine. Enter a user name and password. Once you're enter your user name and password information, click "Next >".


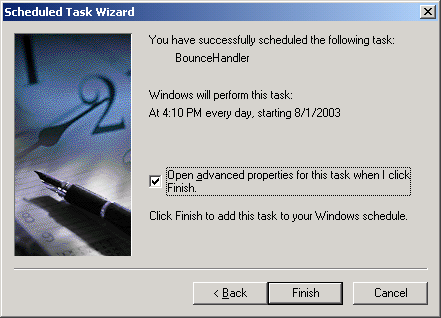
Ok, we're almost done. You are now presented with the option to "Open advanced properties for this task when I click Finish". Make sure you select that option, prior to clicking "Finish".


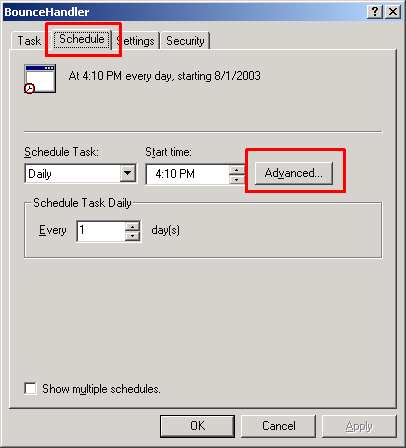
After clicking "Finish", you'll be presented with the following "BounceHandler" Settings Dialog. Click the "Schedule" tab, and then click the "Advanced" button.


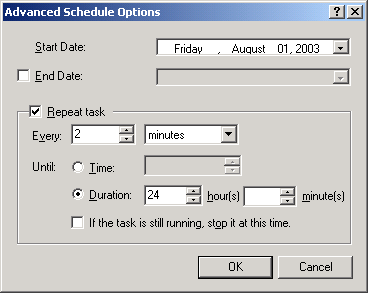
Clicking the "Advanced" button will display the following "Advanced Schedule Options" window. You'll want to make sure the "Repeat Task" check box is selected. Once you do that, then you'll need to set it to repeat task every 2 minutes, for a duration of 24 hours (see image below). This will tell the Task Scheduler to execute your BounceHandler.vbs script every 2 minutes all day long, every day. Feel free to set these settings to whatever you want. Your requirements may be such that you don't need to execute the script that often, but then you may want to execute it every 1 minute instead. It's up to you. Click "Ok" when you are done.


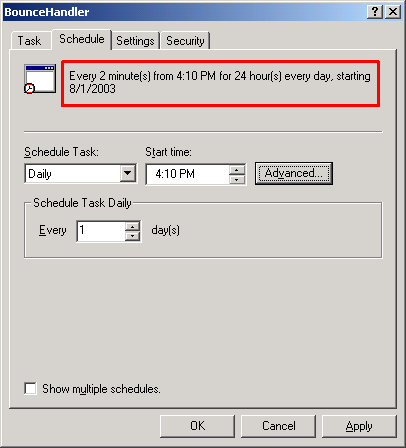
Once you click "Ok", you'll be taken back to the "BounceHandler" Settings Dialog. Make sure your new schedule is correct. You can see that my schedule is configured to run "Every 2 minute(s) from 4:10PM for 24 hour(s) every day, starting 8/1/2003. If everything looks good, click "Ok".


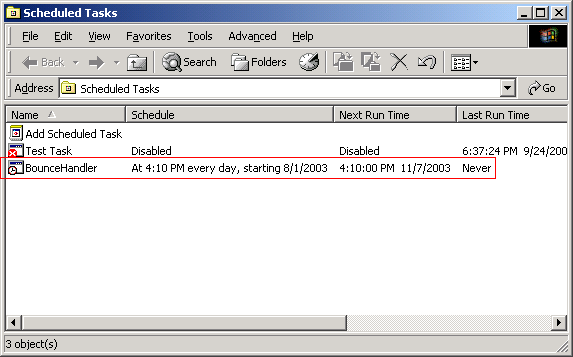
You're done! You've now successfully created a Windows Scheduled Task using the Task Scheduler. At this point, you should be back to the "Scheduled Tasks" window, and you should see your newly created task in the task list.


Conclusion
Hopefully, by reading Part 1 and Part 2 of this article, you've been given a good overview of one possible way of handling your email bounce messages using BoogiePOP Enterprise. The techniques I've shown here are simple enough to implement, yet robust enough for large email campaign houses to use. Remember, the technique I've discussed in this article can be applied to any database system you may be using (i.e. Sql Server, Oracle, MySQL, dBase, FoxPro, etc.).

If you've completed each part of this article, then here's what you've basically created for yourself:

2 Stage Automated Email Bounce Handling Process

  1. BoogiePOP Enterprise Retrieves messages from your bouce email account. Determines the bounce type of each message, and logs bounce data (i.e. affected email address, bounce type, etc.) to your bounce log table.
  2. BounceHandler.vbs script, set up on a Windows Scheduled Task, continually monitors your bounce log table looking for new bounce data to process. As it finds new data to process, it updates your email list table
Questions?

If you have a question regarding this article, then please send an email to "support @ boogietools.com". We'll reply to your request as soon as possible. For more information regarding BoogieTools' products, please visit us on the web by CLICKING HERE.


©Copyright 1998-2024 ASPAlliance.com  |  Page Processed at 2024-04-19 6:15:00 PM  AspAlliance Recent Articles RSS Feed
About ASPAlliance | Newsgroups | Advertise | Authors | Email Lists | Feedback | Link To Us | Privacy | Search