AspAlliance.com LogoASPAlliance: Articles, reviews, and samples for .NET Developers
URL:
http://aspalliance.com/articleViewer.aspx?aId=1007&pId=-1
Building and Using a LINQ for SQL Class Library with ASP.NET 2.0
page
by Scott Guthrie
Feedback
Average Rating: This article has not yet been rated.
Views (Total / Last 10 Days): 43816/ 67

Introduction

Republished with Permission - Original Article

In my previous posts on doing data access using LINQ and ASP.NET, I used the built-in SQLMetal command-line utility to automatically generate the data model classes for my LINQ data classes.   Recently, I have been using the LINQ for SQL (aka DLINQ) designer to define my data models and have been really impressed with how easily it enables me to build a re-usable class library that nicely encapsulates my data and business logic.

The below walkthrough demonstrates how you can get started with it yourself.  Simply install the LINQ May CTP download on top of VS 2005 and you can then follow all of the steps below yourself.  For the sample below I am using C#, but everything works equally well in VB.

Step 1: Create a New LINQ Enabled Class Library

Choose File->New Project within Visual Studio and navigate to the "LINQ Preview" node in the project-type tree-explorer.  Then select the "LINQ Library" project icon and create a new LINQ enabled class library.

Figure 1


This will create a class library project whose MSBuild project file enables compilation support for LINQ.  A default "Class1.cs" file is added to the project - I recommend just deleting it to start with an empty project.

Step 2: Add a LINQ for SQL Data Model to the Project

Right-click on the project and choose the Add->New Item context menu item.  Scroll down in the dialog, select the "DLINQ Object" icon and give it an appropriate name (in this sample I am naming it "Northwind" since I am going to be modeling the Northwind database).

Figure 2


This will add a Northwind.dlinq file to your project and bring up its designer.

Figure 3

You can now use the designer to map your data models and entities graphically, as well as setup associations to map relationships between them.

Step 3: Quickly creating a Northwind data model

One of the really easy ways to quickly define your data model classes is to open up the Server Explorer tab within VS 2005 and connect to your database.  You can then drill into the Tables and Views within your database and drag/drop them from the server explorer onto the DLINQ designer surface to automatically create data models for them.  For example, if I dragged/dropped the Suppliers, Customers, Orders, Order Details, and Products tables onto the designer surface, by default I would get a data model that looks like this:

Figure 4

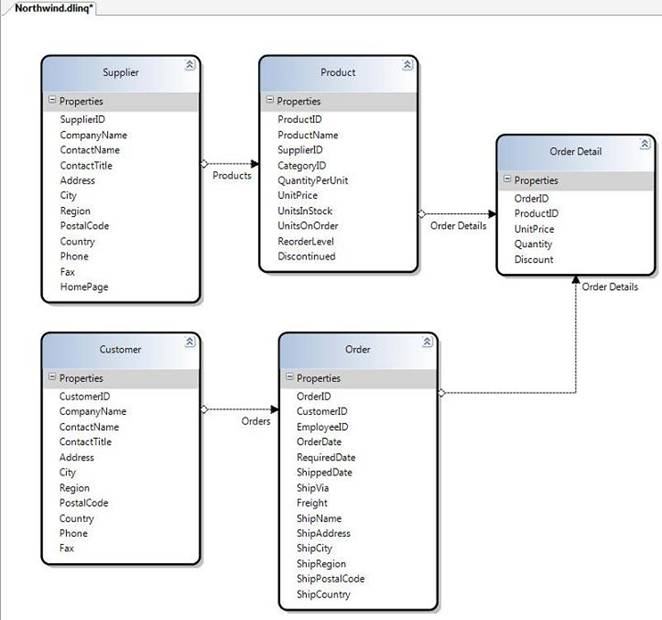
Note how the DLINQ designer automatically sets up default associations between the different entities based on the Primary Key/Foreign Key relationships in the database.  These will automatically cause properties to be created on the various data classes so that we can perform rich querying and/or easily traverse between them.  For example, if I had a "Customer" instance above I could simply access the "Customer.Orders" property to get a collection of all of the Customer's orders in the database.

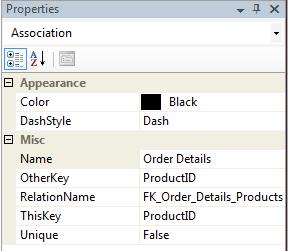
If you want, you can add, delete or alter these associations by simply clicking on the association links in the designer and then use the property grid to change its settings.  For example, if I wanted to modify the "Order Details" associations above to be named "OrderDetails," I would click on the association line in the designer and change it via the property grid below. Or 
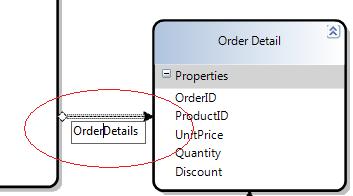
because it supports inline editing for the name, I could also just click on the name in the designer and rename it in place.  See Figure 5 below for both options.


Figure 5

Additionally, I could use the designer to easily rename the entities and/or rename/remove/add properties to them.  
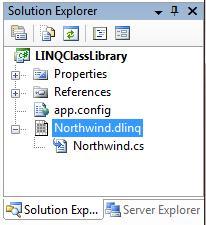
Once we are done defining your data models, we will just save the file.  The designer will then automatically generate a .cs or .vb file containing the LINQ data class definitions.  This is saved in a nested file underneath the Northwind.dlinq item in the solution explorer.

Figure 6

The LINQ data model classes created are defined as "partial" classes" which means we will be able to go in later and add entity and property validation rules that enforce our business logic, as well as add any additional properties or helper methods we want to the classes.

Step 4: Creating a LINQ Enabled Web-Site that References our LINQ enabled Class Library

We will now want to go ahead and build a LINQ-enabled ASP.NET web-site that uses our LINQ class library.  Choose File->Add->Web Site within Visual Studio to add a new project to the solution.  Choose the LINQ web-site template to create an ASP.NET web-site that is enabled with the LINQ compilers.

Figure 7

Your VS solution will then look like this:

Figure 8

The last two steps you will want to take are to:

1) Add a project reference from the web-site project to the LINQ class library.  To-do this, right-click on the web-site and select "Add Reference," select the "Projects" tab and add the reference as normal.

2) Add a connection-string to your web.config file in the web-site project for the LINQ class library.  This will enable you to easily configure and change the connection-string that is used at runtime for the application.  Simply copy/paste the connection-string value in the LINQ class library's app.config file to the web.config file's <connectionString> section to configure this.

Once the above two steps are done, we are ready to build ASP.NET UI pages against our LINQ class library and associated data models.

Step 5: Build a simple Products Listing Page

To give a simple taste of using LINQ, we will build a simple Product Listing page that lists products like the image below.

Figure 9

To implement this, I will add a templated ASP.NET DataList control to the .aspx page using the markup below to define the UI for each product in our list.

Listing 1

<span lang=EN><asp:DataList ID="DataList1" RepeatColumns="2" runat="server">
 
     <ItemTemplate>
     
        <div class="productimage">
             <img src="images/productimage.gif" />
         </div>
     
         <div class="productdetails">
         
             <div class="ProductListHead">
                 <%#Eval("ProductName")%>
             </div>
             
             <span class="ProductListItem">
                 <strong>Price:</strong>
                 <%# Eval("UnitPrice", "{0:c}") %>
             </span>
             
         </div>                
     
     </ItemTemplate>
 
 </asp:DataList> </span>

I can then use the below code-behind class to execute a LINQ query against the class library data model we defined in our class library previously to retrieve all of the products in the database supplier by the "Exotic Liquids" supplier and sorted by the product name.

Listing 2

<span lang=EN>using System;
 using System.Web;
 using System.Query;
 using LINQClassLibrary;
 
 public partial class HelloWorld : System.Web.UI.Page { </span>
<span lang=EN>
     protected void Page_Load() {</span>
<span lang=EN>
         NorthwindDataContext db = new NorthwindDataContext();
 
         DataList1.DataSource = from p in db.Products
                                where p.Supplier.CompanyName == "Exotic Liquids" 
                                orderby p.ProductName
                                select p;
 
         DataList1.DataBind();
     }
 } </span>

Notice how the LINQ query is strongly-typed and can incorporate the Product/Supplier entity association we setup earlier (for example, note how the where statement is able to search by the product's Supplier.CompanyName property which is stored in the Suppliers table and is linked to the Products table via a primary key/foreign key relationship). 

This strong typing model means I get compile-time checking of my LINQ queries today and will get full intellisense support with the new release of Visual Studio.  No more runtime SQL syntax errors!

And that is it.  No additional code required. 

Step 6: Using Debug Visualizers to inspect what SQL is executed against the database

One of the most common questions people wonder when using ORM data frameworks is, "so what SQL code is it running under the covers?"  LINQ makes it easy to figure this out.  Just set a debugging breakpoint on a LINQ expression variable and you can use a built-in LINQ debugging visualizer to inspect it while debugging. 

For example, set a breakpoint on the DataList1.DataBind() method above and when it is hit, hover your mouse over the DataList1.DataSource property and click the magnifying glass to launch its DLINQ query visualizer.

Figure 10

This will bring up a visualizer dialog that displays the SQL statement that LINQ will execute against the database when evaluating that LINQ expression.

Figure 11

If you click the "execute" button on the bottom-right you can even test out the query in the debugger and see the exact data that will be returned from it when the supplier name is "Exotic Liquids.

Figure 12

This makes it really easy to see the exact SQL that is executed and closely watch what is going on as you modify and refine your LINQ queries.

Summary

Hopefully the above walkthrough provides a good introduction to some of the cool things you can do with LINQ and the LINQ May CTP version of it. 

To learn more about LINQ with ASP.NET, please download and run the slides + samples from my recent "Building Web Applications Using LINQ" talk.

Hope this helps,

Scott

Resources


©Copyright 1998-2024 ASPAlliance.com  |  Page Processed at 2024-03-19 4:57:25 AM  AspAlliance Recent Articles RSS Feed
About ASPAlliance | Newsgroups | Advertise | Authors | Email Lists | Feedback | Link To Us | Privacy | Search