Adding a row to a repeating table is as simple as adding the appropriate nodes and attributes to the XML document. InfoPath is just XML. The UI provides some very rich controls, but those controls cannot be interfaced with directly. It is the XML structure that needs to be edited. Any changes in the underlying XML document will be reflected automatically in the controls in the UI.
1. To set up the example, create a new blank InfoPath form from Visual Studio .NET, using C#.
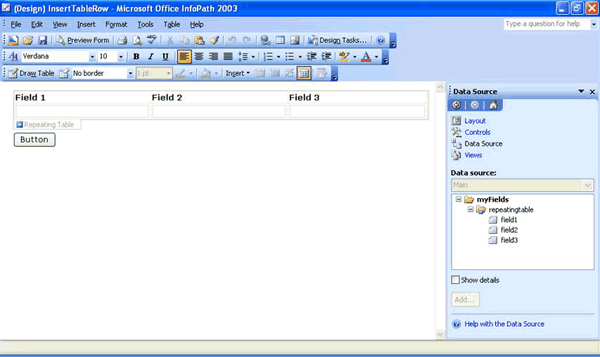
2. Edit the Main DOM Data source so that it looks similar to Figure 1.
3. Drag the Repeating Table element onto the blank form canvas and choose repeating table as the control to use.
4. Add a Button control beneath the repeating table on the form canvas, so the form looks similar to Figure 1.
Figure 1 – Form Layout and Main DOM Data Structure

5. Open the button's properties window by double-clicking on the button
6. Click on the "Edit Form Code" button.
7. An event handler stub is added to the FormCode.cs file for the button’s OnClick event. Add the code listed in Listing 1 to the body of the new method.
Listing 1 – Button OnClick event
// get a reference to the node the repeating table is bound to
IXMLDOMNode row = thisXDocument.DOM.selectSingleNode("//my:repeatingtable");
// make a copy of the node by cloning it
row = row.cloneNode(true);
// set the new values of the row’s fields
row.selectSingleNode("my:field1").text = "new row field 1";
row.selectSingleNode("my:field2").text = "new row field 2";
row.selectSingleNode("my:field3").text = "new row field 3";
// append the cloned row to the parent node
IXMLDOMNode parent = thisXDocument.DOM.selectSingleNode("/my:myFields");
parent.appendChild(row);
Test the form by previewing it and clicking on the button. A new row should be added to the repeating table.