[ download code ]
The next item we will discuss are the various editors that are available.
- File System Editor (displayed in Figure #2)
- Registry Editor
- File Types Editor
- User Interface Editor
- Custom Actions Editor
- Launch Conditions Editor
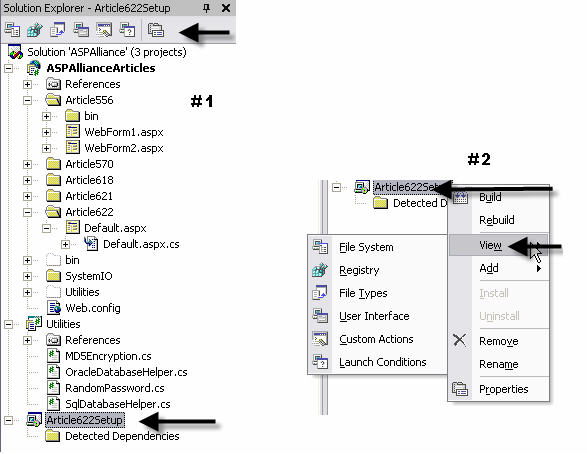
There are several ways you can access these editors. Here I will illustrate two of these methods.

Figure 3: Access the various editors
As you can see in the above figure I have indicated two ways to access these editors. In example number one a single click on the setup project you have created with Solution Explorer provides a menu of the various editors. Whereas in example number two if you right click on the setup project and then click ?View? you are then provided access to the various editors. Basically it is simply a matter of choice as to which method you desire.
File System Editor
The File System (Figure 4) provides you the essential tools to work with the application folder, user's desktop, and the user's programs menu.

Figure 4: File System Properties
The first thing we want to do here is to include the relevant files and folders we wish to install on the user's machine. This is accomplished by right clicking the Application Folder and selecting 'Add'. In this case I will choose 'Folder' and give this newly established folder the name of 622. Now to add files to this folder, right click the folder 622 and choose 'Add'. Merely add one or more of the files that is vital for your application. Now that you have you files and folders in place you could take additional steps such as manipulating the user's desktop with items such as a shortcut, as well you can add a program group to the user's program group. The following screenshot is an example of something similar you may see.

Figure 4.1: File System Properties
If you have a requirement to modify the user's registry then the Registry Editor is a straight forward tool that provides this capability.

Figure 5: Registry Editor
Next is the File Types Editor. If you need to establish file associations on the user's computer with your application then this editor will achieve the desired task.

Figure 6: File Types Editor
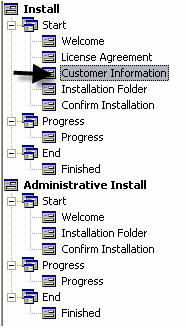
The next item you find of immense importance is the User Interface Editor. Inside of this editor you may eliminate or include dialogs that are needed for this install project. The following screenshot is the default User Interface that is created when I initially created this setup project (See Figure 1). The only variation is that I have added a Customer Information dialog.

Figure 7: User Interface Editor
To include the Customer Information dialog that I spoke of follow the following steps.
- Under Install right click on the 'Start' node
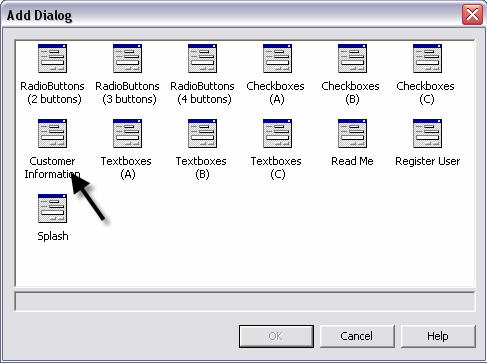
- Choose 'Add Dialog'

Figure 7.1: User Interface Editor
- Select the Customer Information Dialog and click 'OK'
As you can see there are is an ample variety of dialogs you can choose from. Take the time to look over each one and understand the use behind them.

Figure 8: Custom Actions Editor
The Custom Actions Editor allows you to specify additional actions to be performed on the target computer at the end of an installation. For the purpose of this article, I am not going into details relating to custom actions rather to learn more on this subject read up on Custom Actions Management in Deployment.

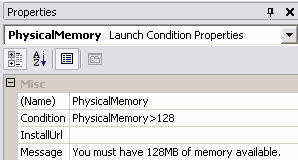
Figure 9: Launch Conditions Editor
In the above example, I have added a condition to verify that the user's computer has at least 128MB of RAM. If the user's computer does not meet this stipulation then the application installer will graciously inform the user of this stipulation and exit the install process. As you have probably already concluded this feature can be significant in many aspects, for example; free space on the hard drive and the amount on installed memory just to name a couple. There is nothing more embarrassing from a developer's point of view to have your application fail at the install process. If you take time and think of this, would you be impressed with an application you are looking forward to using only to have the install process fail?
Now we will take a moment to look at the Physical Memory launch condition that I have created. To add new conditions do the following.
- Right click Launch Conditions and choose 'Add'

- Provide a name for this condition such as I have in this example
- Right click the 'PhysicalMemory' condition and choose 'Properties'

In this case the condition I have established is that the physical memory must be greater than 128 MB. Be sure to look at the Windows Installer Property Reference regarding the various properties that are available when working within the Launch Conditions Editor.