While working with a database as the data source for your TreeView Control requires a little more effort and code than an XML data source, it is still a straight forward process. We will be working with two tables, one named EMP and the other DEPT. You are probably asking yourself, “Where are the emp and dept tables?” No fear, I have included them with the sample code download. Be sure to execute dept.sql and then emp.sql, in this order.
The first thing you must do is add a reference to ODP.NET (Oracle.DataAccess.dll) from your ORACLE_HOME. Add a new Web Form and define the strings for your database authentication and SQL statements, as well be sure to import the namespaces Client and Types.
Listing 2: SQL and Database Authentication Strings
private const string dbConnString = "Data Source=dbinstance;User ID=userid;
Password=password;";
private const string empQuery = "SELECT * FROM emp";
private const string deptQuery = "SELECT * FROM dept";
Note: Be sure to change dbinstance to the Oracle service you are using, as well as include the proper username and password.
Listing 3: ODP.NET Imports
// ODP.NET Import(s)
using Oracle.DataAccess.Client;
using Oracle.DataAccess.Types;
Now that you have imported the Client and Types namespaces and defined your database connection string, employee query, and dept query, it is time to write the code that will query the database and populate the TreeView control. We will start with the GetData() method, since we require a DataSet to populate the actual TreeView control.
Listing 4: GetData() Method
public DataSet GetData()
{
    OracleConnection dbConn = new OracleConnection(dbConnString);
    OracleDataAdapter empDataAdapter = new OracleDataAdapter(empQuery, dbConn);
    OracleDataAdapter deptDataAdapter = new OracleDataAdapter(deptQuery, dbConn);


    DataSet myDataSet = new DataSet();


    empDataAdapter.Fill(myDataSet, "emp");
    deptDataAdapter.Fill(myDataSet, "dept");


    myDataSet.Relations.Add("Child", myDataSet.Tables["dept"].Columns["deptno"],
    myDataSet.Tables["emp"].Columns["deptno"]);


    return myDataSet;
}
The GetData() method performs the following:
- establishes a connection to the Oracle database;
- establishes an employee DataAdapter; and
- establishes a department DataAdapter.
The one unique thing that I am accomplishing here is utilizing the Relations property of the DataSet to build a DataSet of linked tables, which in this case are the two tables named EMP and DEPT. If you are not familiar with the Relations property, you may read more at MSDN. Now that you have a DataSet populated via the EMP and DEPT tables, then joined via the Relations property of the DataSet, it is now time to populate the TreeView with the PopulateTreeView() method.
Listing 5: PopulateTreeView()
public void PopulateTreeView()
{
    DataSet myDataSet = GetData();
    foreach (DataRow parentRow in myDataSet.Tables["dept"].Rows)
    {
        TreeNode parentNode = new TreeNode((string)parentRow["dname"]);
        TreeView1.Nodes.Add(parentNode);
        foreach (DataRow childRow in parentRow.GetChildRows("Child"))
        {
            TreeNode childNode = new TreeNode((string)childRow["ename"]);
            parentNode.ChildNodes.Add(childNode);
        }
    }
}
As you look at the PopulateTreeView() method in Listing 5 above, you will notice that I first instantiate a DataSet named myDataSet, that in turn calls the GetData() method. The next step in this process is to loop through the rows contained within our DataSet, which will be our parent rows, and as well I have a loop inside the parent to retrieve the child rows. This is the overall process of how the TreeView is built.
The last thing to do, only for testing purposes, is to call PopulateTreeView() within the Page_Load method.
Listing 6: Example Page_Load
protected void Page_Load(object sender, EventArgs e)
{
    PopulateTreeView();
}
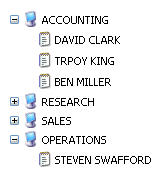
Now execute the Web Form and you should see a TreeView similar to the following:
Figure 5: Rendered Web Form Containing a TreeView Control