The basic way to change the look and feel on the WSS Site is
by using Themes. The designer can use the following steps to change the theme
in the WSS Site.
·
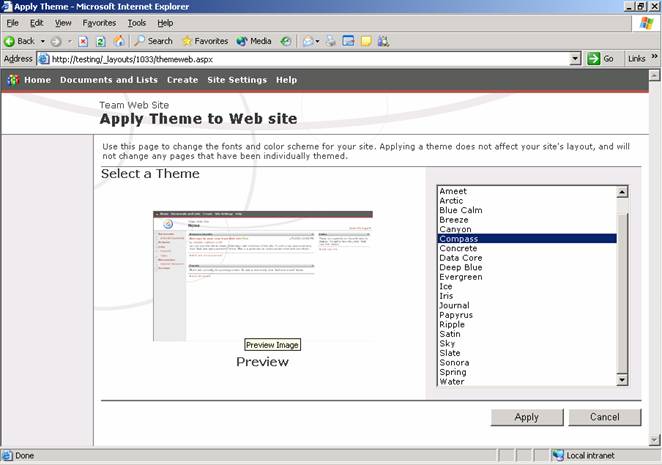
Click on Site Settings.
·
Under Customization, Click on Apply Theme to Site.
Figure 1

·
Click on the appropriate Theme from the list.
Figure 2
·
You will see the image of the theme just above Preview.
·
Click Apply.
So, how does WSS pick up the theme information? Again, as
explained in my SharePoint Templates article, most of it is taken from the file
system. The SharePoint files are stored under C:\Program Files\Common
Files\Microsoft Shared\web server extensions\60.
Under this folder there is a folder called TEMPLATE and
underneath this folder there is a folder called Themes.
If you look at the folder structure for Themes, you will
notice that all the Themes have individual folders under the Themes folder (Figure
2).
For this example, I am going to create my own theme from an
existing theme named Afternoon. You can use Paintshop or another graphic tool
to do all your graphics.
Steps to create your own theme:
·
Copy the Afternoon folder and paste it to the Themes folder.
·
Rename Copy of AFTRNOON folder to AMEETTHEME.
·
Double click on the AMEETTHEME folder.
·
Rename all the file names that reference Afternoon in the name to
Ameettheme.
·
Open the AMEETTHEME.INF file and change the title from Afternoon
to AmeetTheme.
·
We need some way of informing WSS that a new theme has been
added. As you might have noticed in my previous article, SharePoint uses a lot
of XML files to keep track of templates and lists. In this scenario it is the
same. We need to modify the SPTHEMES.XML file. Here is the twist on the
location of this file. When I started researching WSS templates, I thought the
file would be somewhere in the Themes folder, but I found it under C:\Program
Files\Common Files\Microsoft Shared\web server
extensions\60\TEMPLATE\LAYOUTS\1033.
·
In the SPTHEMES.XML file, copy the Afternoon section and create a
new XML section as follows.
<Templates>
  <TemplateID>ameettheme</TemplateID>
  <DisplayName>Ameet Theme</DisplayName>
  <Description>Description</Description>
  <Thumbnail>../images/thanoon.png</Thumbnail>
  <Preview>../images/thanoon.gif</Preview>
</Templates>
·
After the above steps are done, you have to do an IISRESET.
·
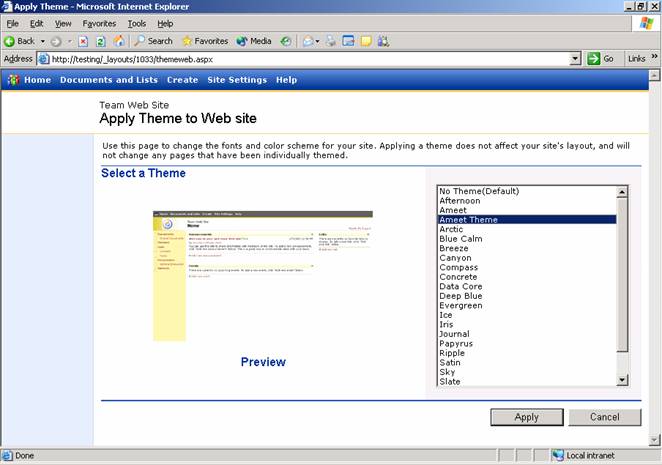
Run the WSS Site in your browser and then go to Apply Themes to
Web Site page. You should now be able to see the new Theme you created. In my
scenario I have Ameet Theme listed.
Figure 3
In the above
section I explained the simplest way of changing the look and feel for your
website. In the next section I will explain how you can completely modify the
main page with new graphics.