by Devarticles.com
Feedback
|
Average Rating: This article has not yet been rated.
Views (Total / Last 10 Days):
37996/
74
|
|
|
|
| Data Binding in Windows Applications |
There are several ways to use ADO.NET in a Windows application. One of the easiest is by using a data form. Let's now see how to use a data form to access data from Authors table.
Using the Data Form Wizard The data form wizard is a handy tool. It helps you create data bound controls on windows form or web pages. The wizard itself writes code for loading the controls with data or updating the data.
Running the Data Form Wizard is like adding an item to a project, but here, we have to keep in mind that a Data Form can be added to a project that supports forms. The task of creating Data Forms can be accomplished with following few steps:
1. Start a new project. Select Add New Item from File menu.
2. Select Data Form from the dialog box.
3. The wizard opens up automatically with a welcome screen. Just press next and it starts working.
4. On the next page of the wizard, you have to select an existing DataSet or create a new one. Here, we'll create a new one and use the Pubs database for that. The next few steps will explain how to do that. Enter "DSet1" for your dataset's name and select "New Connection" from the next screen.
5. This opens up the Data Link dialog box. You can connect to the server and set a link to the required database here.
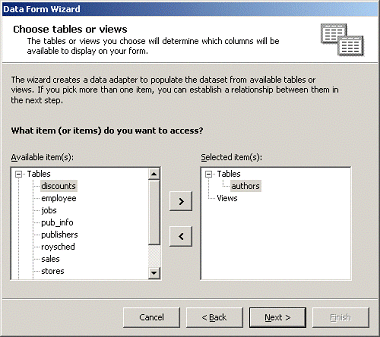
6. Once the link is established, the Data Form wizard takes over again showing tables from the database. Select the required table (authors ) and add it to the "Selected Items" by clicking on the ">" button:
7. From the "choose tables and columns to display on the form" dialog box, select the fields that you need. The Data Form Wizard is about to complete its job. It will now show the final screen asking us if we want all the rows to be displayed at a time in the DataGrid control, or a single row at a time, bound to controls. Let's select all the rows in a grid control for this example.
The wizard now generates the DataForm and adds it to the project. The form contains a button for loading the data in the grid, and also buttons for canceling all and updating. Code for the click events of these buttons is written by the wizard making our lives easier.
To run the project you either have to write some appropriate code or make the DataForm a StartUp object. You can see the DataForm in action once you click the "Load" button.
Similarly, if you had selected individual records, the wizard will ask if you need controls for editing and navigation. If you select these controls, then it will generate the form using controls for every field and create the navigation and other buttons for you. |
|
|
|
User Comments
Title:
PC Analyst
Name:
Eddie Mathews
Date:
2006-11-27 6:23:17 PM
Comment:
I am new to Visual Studio after many years of employment in other industries. Now I want to come but I am having problem locating the Data Form Wizard. I know my installation is correct.
Thanks buddy
|
Title:
Joe
Name:
Joseph David
Date:
2006-05-04 5:32:24 AM
Comment:
Click any Customer from the first grid and you will notice the second grid displaying records only for the selected Customer
how this work
|
|
Product Spotlight

|
|
|